
Sometimes the most frustrating bugs turn out to have surprisingly simple explanations.
While working on a lighting mechanic for a small Unity prototype, I encountered a problem that initially seemed to be related to the lights themselves.
The scene wasn’t responding to lighting as expected, and the result looked noticeably flatter than it should have.
What I eventually discovered was that the problem wasn’t in my code or the lighting mechanic.
It was in the project’s rendering configuration.
The Problem
We had recently moved our prototype from a 2D setup to a 3D environment using Unity’s Universal Render Pipeline (URP).
The scene now contained 3D objects, but something wasn’t right.
Lighting and shadows weren’t behaving as expected. Despite working with a three-dimensional environment, the objects didn’t show the depth and shading I was trying to achieve.
At first, it was tempting to assume that I had made a mistake while setting up the lights.
However, there was another possibility: the issue might not be caused by the lights themselves, but by the system responsible for rendering the scene.
Understanding the Renderer in URP
Unity’s Universal Render Pipeline provides different renderers for different rendering requirements.
Two relevant options are:
- 2D Renderer: designed primarily for 2D projects, including workflows that use sprites and 2D lighting.
- Universal Renderer: supports conventional 3D rendering, including lighting and shadows for 3D objects.
Both belong to URP, but they aren’t interchangeable in every situation.
A scene can contain 3D objects while the project is still configured to use a renderer intended for 2D workflows.
That distinction became the key to understanding what was happening.
Finding the Cause
After investigating the problem, I discovered an important detail that we had overlooked during the transition.
The project was still using the 2D Renderer.
We had adapted the prototype to a 3D environment, but the renderer configuration hadn’t been updated to match.
This explained why changing the lighting itself wasn’t addressing the underlying problem.
The issue was in the rendering pipeline configuration, not necessarily in the individual lights or their parameters.
The Solution
The solution was to switch from the 2D Renderer to the Universal Renderer, which was appropriate for our new 3D setup.
In URP, the renderer used by a scene is determined through the project’s rendering configuration, including its URP assets and renderer assignments.
After correcting the configuration, the difference was immediately noticeable.
The objects responded to the lighting as expected, and shadows became visible in the environment.
The same scene now had much more visual depth.
Before and After
The following screenshots show the difference between the incorrect and corrected renderer configurations.
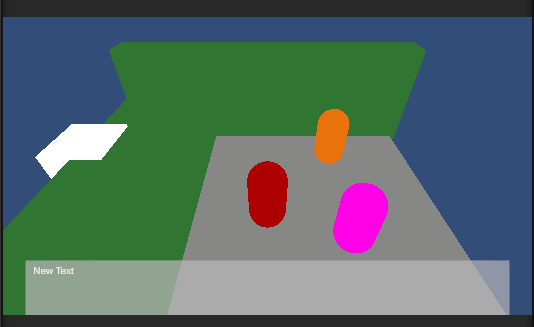
Before: the 3D prototype was still using the 2D Renderer, resulting in incorrect lighting behaviour.
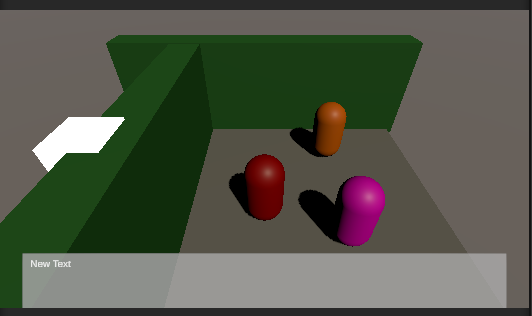
After: switching to the Universal Renderer allowed the scene’s 3D lighting and shadows to behave as expected.
The geometry hadn’t changed. The difference came from how the scene was being rendered.
That’s what made this issue particularly interesting: a project-level setting had a significant impact on the visual result.
What I Learned
Not every bug is caused by code
When something goes wrong, my first instinct is often to look for a mistake in a script.
But game engines involve much more than programming.
Project settings, imported assets, physics configurations and rendering pipelines can all influence how a game behaves.
In this case, changing the code wouldn’t have solved the underlying problem.
Check the configuration before changing the implementation
When investigating a visual issue, it’s worth checking the project’s rendering configuration before spending too much time adjusting lights, materials or scripts.
A useful starting point is to ask:
- Which render pipeline is the project using?
- Which renderer is assigned?
- Does that renderer support the lighting features the scene needs?
- Have any important project settings been left unchanged after a technical transition?
These questions can help narrow down the source of a problem.
Technical transitions require more than changing components
Moving a project from 2D to 3D involves more than replacing sprites or changing physics components.
It can also affect the rendering pipeline, cameras, lighting, materials and other systems.
This experience reminded me that technical decisions often have consequences beyond the specific feature I’m working on.
Final Thoughts
The solution turned out to be straightforward, but finding the cause was a valuable learning experience.
I learned more about how Unity URP works and why renderer configuration matters when building a 3D scene.
More importantly, it reinforced a lesson I expect to encounter repeatedly while learning game development:
Understanding how the engine works is just as important as understanding the code you write.
And that’s exactly why I’m documenting these experiences. Every problem solved is another opportunity to learn.